Lines and Angles - Constructing shapes
lines and angles are heard of in almost every topic under mathematics. The relationship between these and the many different creations it can make are both complex and beautiful. From these, the first we'll be looking into is the construction of shapes using these lines and angles.
There are quite a lot we can do under this too but lets stick to your syllabus right? When we are constructing rectangles and triangles, one thing to always remember is that all the angles in both is 90 degrees. So the important thing to consider here is the length of the sides.
To draw a square, knowing just one side length is enough. For example, we are asked to construct a square of with a side length of 5 cm. To do this we start by drawing one side of the square. Then we take 90 degrees from one end of that line with a protractor. Like so,

Then we need to align our ruler with the point we marked and again draw a line of 5 cm.

We repeat this process until we get a full square.
When we look at constructing rectangles, we do the same thing as in constructing a square but with different side lengths.
Constructing a triangle however differ slightly from the other two. For one thing, in a triangles all the angles will not be 90 degrees and they are unlikely to be equal in most cases. So you need to be more careful here.
For example, we are asked to draw a triangle in which sides AB = 4cm, BC = 3 cm and AC = 5 cm.
First we will draw one of these lines as the base of the triangle after leaving enough space for working above. In this example, I am going to take AB as base. You can take any you want but remember to label correctly,
Now we can't proceed as we did when constructing square because we don't know the angles. we can't use protractor to mark an angle we don't know right. So here we use the simple geometric trick of constructing locus. It means marking the area that is a certain length from a point. Here, we are going to mark the area that is 5 cm from A and the area that is 3 cm from B.
To do this, we take a compass and use a ruler to open it to exactly the length given like so,


Now we just have to mark the point of intersection of the 2 arcs as 'C' and just connect it with other 2 points with straight lines. And just like that were done!
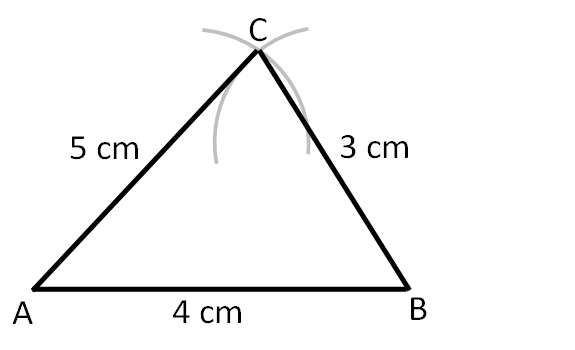
Note: Remember to label all the sides as you proceed so that you don't confuse them at the last step.
For more understanding, watch the video below that I made specially for you all who hate reading or are too lazy to do so.
As you all might have noticed, this topic is interesting and fun. It would be a shame to leave without trying some of these on your own. So be sure you complete the worksheet and quiz below.
Or go to Kahoot and use the code 04570037


This is so easy when you explain it. Thank you 😁💜
ReplyDeleteThis was helpful
ReplyDeleteThe way u explained is so easy to understand ☺️
ReplyDelete